
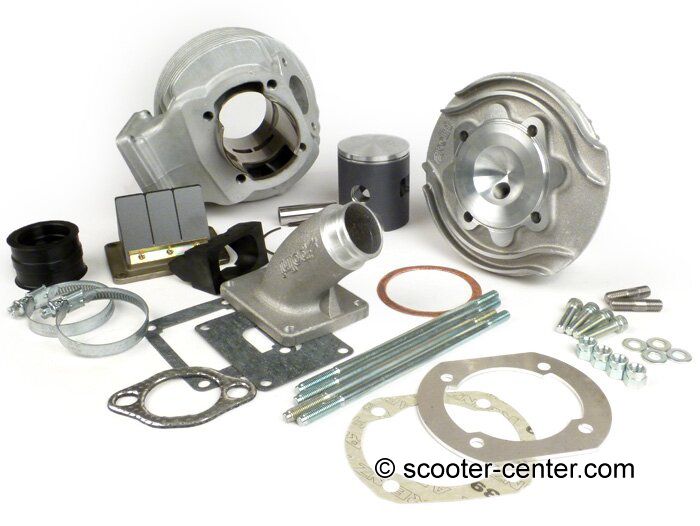
From 2014, a standardized package is permitted in class 1 of the ESC. The basis for this package is the direct-intake
Polini Evolution cylinder modified for the ESC version.The standard solution with the
Polini 133cc Evolution reed valve may only be used in ESC Class 1 without modification and with the exhaust provided for this purpose. After consultation with Polini and Ludwig & Scherer, we were able to achieve a package price of currently €625 for ESC riders. Approval to purchase the kit must be obtained from the
ESC. You can find the current regulations at www.eurochallenge.de The basic idea behind the standardized solution is that you as a rider can concentrate more on the actual riding on the track than on the sometimes quite complex engine concepts, just like in Class 5. With the "large standardized class" and the Polini 133cc Evo, a performance of approx. 25 hp is possible. In close cooperation with the ESC, we have created this kit for you and carried out some tests on our P4 test bench.

The
cylinder kit, which has been reworked to
51mm stroke, can of course also be ridden normally on the road once it has been approved by the TÜV. Even if you do not take part in ESC racing events, we can offer you this kit. But then at the regular price, as the cylinders for ESC use are specially discounted by Polini.

To be able to install the cylinder, you should pay attention to a few things in detail.
Crankshaft / crankcase
The cylinder kit has been redesigned for use with a crankshaft with 51mm and 105mm connecting rods and supplemented with a suitable spacer. The following crankshafts fit:
bgm Pro 51/105 ETS 24mm and
bgm Pro 51/105, 20mm and of course all other crankshafts with a 51mm stroke and a connecting rod length of 105mm.
A crankshaft with a standard connecting rod length of 97mm cannot be used.To install the bgm crankshaft, you must prepare your crankcase. In the "small half of the engine", i.e. on the alternator side, the diameter of the crankcase must be increased to 88mm. In the large half of the crankcase, the drive side, it is usually sufficient to remove the rotary valve sealing surface.

You must also ensure that the crank webs and connecting rod have clearance above the rotary slide seal face.

When assembling the engine, we recommend that you use
ball bearings with increased bearing clearance and
FPM shaft seals for the crankshaft bearings. These can operate trouble-free and permanently even at higher speeds.
 Cylinder / overcurrent channels / cylinder base
Occasionally, some burrs may appear on the cylinder base due to the coating. It is therefore advisable to deburr the edges before assembly.

In order to accommodate the large overcurrent channels, the Polini cylinder is significantly larger in the area of the channels than a cast iron cylinder, for example. You will therefore have to machine your stator housing.

It is not absolutely necessary to machine the motor housing. The part of the stator housing can also simply be removed with a saw.

Since no sealing is required on the resulting surface, you can simply level the surfaces with a file.

The overcurrent channels in the motor housing do not necessarily have to be aligned. According to the ESC regulations, however, this is permissible. We were unable to determine a performance or speed advantage by adjusting the overcurrent channels in the housing on the test bench. The overcurrent system clearly thrives on direct ventilation from the direction of the diaphragm.
Intake manifold / diaphragm/spacer
Due to the fact that the cylinder is ventilated directly, the housing inlet must be sealed. This can be done by filling the intake tract with so-called cold
metal or by using a
sealing plate, the latter is available for 2-hole and 3-hole engines. When using cold metal, the intake port can only be used again with increased effort. With the closing plate, you have the option of using a cylinder with intake housing at any time. We have used a closing plate on our engine. After fitting, you still have to adapt the closing plate to the cylinder.

Optionally, you can also machine the spacer to create the necessary space for the closing plate.

The intake manifold of the Polini cylinder is designed for good flow and therefore good performance. However, the shape of the intake means that space must be created on the frame accordingly. Depending on the model used, V50 or PK, more or less major modifications are necessary here. If you do not want to modify your (racing) frame to fit, you can also use an optional
intake manifold from MRP according to the regulations. Due to the different shape, the intake manifold fits into your scooter without major modifications.

However, the good fit is then unfortunately also due to some loss of performance compared to the Polini intake manifold. You may not further process the Polini membrane, for example by cutting out the bars etc. As a replacement or as an option, you may use
carbon plate material or one-piece membrane plates in any material thickness. The use of Boyesen membrane sheets, a similar, multi-part principle or other membranes is not permitted in Class 1.
VERGASER
We used a Mikuni TMX 30 and a Keihin PWK 28 on the test engine we put together. As our test engine has already ridden almost all ESC tracks, we can also give you some tips on suitable tuning. Of course, these tips should only be seen as guidelines. You have to find out the exact setting on your motor yourself, but so that you don't have to start from scratch, we have briefly summarized the jetting settings we used on the tracks.
MIKUNI TMX 30
Secondary jet 20-22.5 needle 5EL-68 2°-3° Main jet 260-280 (with PJ!) Powerjet 85-100
Keihin PWK 28
Secondary jet 38-42 Needle JJH 2°-3° Main jet 142-148
IGNITION
Here, on our test engine, we used the
"Polini-Tronik" . In terms of purchase and equipment, it is somewhat more interesting than the
Vespatronic.
Malossi now also
offers another interpretation of the IDM-based ignition system. The basic setting on our test engine turned out to be a ZZP of 26°-18°. This ignition setting offers the best compromise between early onset torque and good speed behavior after peak power. On racetracks with significantly longer straight sections, such as the club circuit in Magny-Cours or
the new circuit in Mirecourt, you should reduce the ignition setting by 1°-2°. The same applies to the ignition setting: you have to try out what runs best on your engine and what suits you best in terms of character.
EXHAUST
The current ESC K1 exhaust is based on a prototype of the ALEX1, which works very well on the case-aspirated cylinders of class 1 and makes performance well above the 25hp limit possible.

The new routing makes it an ESC-K1 exhaust

with good lean angle clearance.
 SUMMARY
Permissible trailing edge 1.0 - 1.2mm Spacer 3mm (included),
additional spacers may be used to adjust the trailing edge. Spark plug:
Ignition setting (IDM-based ignitions, KyTronik curve no. 7)
Carburetor and jetting:Mikuni TMX 30
Secondary jet 20-22.5 needle 5EL-68 2°-3° Main jet 260-280 (with PJ!) Powerjet 85-100
Keihin PWK 28
Secondary jet 38-42 Needle JJH 2°-3° Main jet 142-148
 DE | €

 - Vespa Primavera 50 3V iGet (Euro5), Sprint 50 iGet (Euro5), Piaggio Liberty 50 iGet (Euro5) order online!")

, DL, GP, J, Lui browse online now!")

