These handlebar end indicators from MOTOGADGET - Made in Germany - are the first choice if the blinker is to be perfectly integrated into the vehicle concept. These super-flat LED handlebar indicators are very inconspicuous, but once the observer sees them, they are sure to be a visual highlight of your scooter. The workmanship and materials used are of a very high quality. Installation is totally simple if your Vespa is already equipped with handlebar end indicators. With our wiring harnesses these indicators can be retrofitted to any scooter with a little skill - the indicators also fit a Harley, for example - see video. In addition, the LED indicators are a real plus in terms of road safety thanks to their brightness and the E-mark.
m.blaze disc by motogadget - a handlebar end blinker
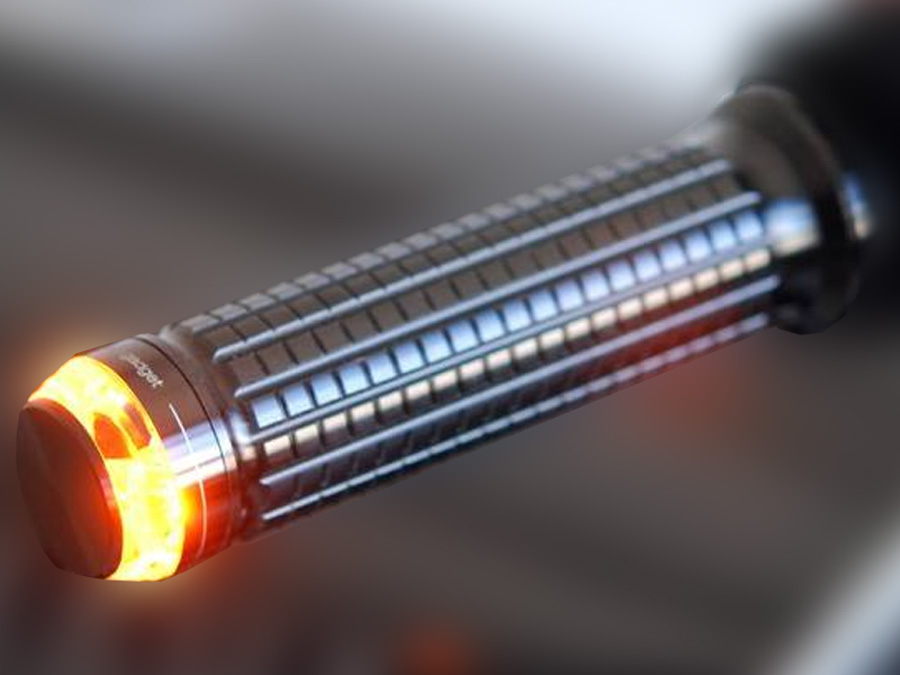
The m.blaze disc is the latest generation indicator light. The characteristic feature of the LED blinker is the transparent lens on a compact aluminum base that harmonizes with the handlebar end grip.
TranzLight blinker
Indicator system that uses the new TranzLight technology (TLT, patent pending). This progressive development approach is not limited to simple miniaturization of blinker housings, but shapes the light directly via a crystal-like plastic body. Only precise optical CAD calculations and state-of-the-art manufacturing processes make this innovative design and its function possible. The light flow required for the TranzLight principle is generated by the intensiLED® process developed by motogadget and consists of three important components:
Selected high-performance LEDs with maximum efficiency and a total output of 7W with a service life of more than 50,000 h
An IC-controlled constant current regulator clocked at 330kHz
A special collimator optic that couples the light from the LED precisely into the plastic body
The discreet aluminum housing is only used for the stable attachment of the glass body and the integration of control electronics and high-end LEDs. It goes without saying that the housing is CNC-machined, black anodized and finely laser-marked. The handlebar end blinker has a very flat design and appears neutral and unobtrusive thanks to the transparent lens. This makes it suitable for many styles and a wide variety of scooters and even motorcycles, quads... The blinker can be operated like any standard LED blinker with load resistors or all our load-independent flasher relays.
Advantages
Absolutely unique, independent design and functional principle
Barely noticeable on the handlebars when switched off
Extremely bright light to the front, clearly visible light to the rear
State-of-the-art high-performance LED technology IntensiLED
Electronic voltage conditioning and safe protection electronics
Indicator light can be omitted
Closes the handlebar end very harmoniously - especially with m-Grip and other aluminum grips
Scope of delivery
The indicators are available individually or as a set
Single handlebar end blinker m.blaze disc left or right with clamp for steel and aluminum handlebars (22 mm and 1 inch handlebars) with an inner diameter of 14 mm to 21 mm
Supplied with rubber clamps for metric steel and aluminum handlebars (22 mm and 1 inch handlebars) with an inner diameter of 14 mm to 21 mm
Power consumption
approx. 7 watts
Fitting instructions for handlebar end indicators
The m-Blaze disc is suitable for fitting to handlebars with an inside diameter between 14 and 21 mm. Select the mounting elements required for your handlebars using the following diagram: Motogadget-led-blinker-disc-installation_manual_ The m-Blaze disc must be mounted horizontally and the angle of the handlebar inclination must be within a range of 0° to max. 9°. Clean the inside of the handlebar tube before fitting the blinker. Only a clean and grease-free surface allows the blinker to be securely attached. Drill a 3 mm diameter hole in the underside of the handlebar center for the cable outlet. Alternatively, a hole can be drilled on the left and right after the switch fittings. The hole must be carefully deburred on the inside and outside. No tensile forces must be exerted on the connecting cables. This can cause the cable to be torn out of the blinker housing or chafe through at the handlebar exit point. Ensure that the cable is long enough and pay attention to the steering angle. We recommend protecting the cable at the exit point with shrink tubing. DAMAGE TO THE CABLE INSULATION CAN LEAD TO A SHORT CIRCUIT AND A CABLE FIRE; THERE IS A RISK TO LIFE. Use the blinker marked "L" for the left handlebar side and the blinker marked "R" for the right handlebar side. Guide the blinker connection cable into the tube opening and from the inside through the 3 mm hole to the outside. Use a rigid piece of wire to help you do this. Slightly tighten the M8 nut on the blinker so that the rubber piece expands slightly. Push the blinker into the tube, ensuring that the rubber piece makes contact with the tube wall. Turn the blinker clockwise by hand (do not use a tool!) to stretch the rubber piece in the handlebars. Turn the blinker until a considerable amount of force is required to release the blinker; the motogadget logo must still be visible from above. If the rubber piece inside the handlebars does not spread open, pull out the blinker, return the connecting cable to its original position by turning the blinker housing anticlockwise, pre-tension the rubber piece more by tightening the M8 screw and repeat the installation process. THE CONNECTION CABLE CAN BE DAMAGED IF IT IS TURNED TOO OFTEN IN ONE DIRECTION. DO NOT TURN MORE THAN 4 TURNS IN ONE DIRECTION DURING AN INSTALLATION ATTEMPT. IF NECESSARY ABORT THE ATTEMPT AND TIGHTEN THE RUBBER PIECE MORE. when attempting to fit again, turn the cable back to the starting position. connect the red connection cable of the left blinker to the positive cable of the left blinker circuit and the red cable of the right blinker to the positive cable of the right blinker circuit. Connect the two black connection cables to vehicle ground. The crimp connectors supplied are used for this. Test the function of the indicators. If the flashing frequency has changed, you will need an electronic, load-independent flasher relay. the indicators are correctly fitted and comply with the legal requirements if the blinker with the "l" marking is fitted to the left-hand side and the blinker with the "r" marking is fitted to the right-hand side and the motogadget logo is visible from above on both sides.
 DE | €
- 3.00 - 10 inchTT/TL 50S 180 km/h (reinforced) buy here now!")


