Basic setting
Every scooter is designed with a specific chassis geometry, with height and fork angle also playing an important role. By replacing individual components, these values can be influenced and the characteristics changed. It is important to ensure that the front and rear always fit together. The change to
bgm-shock absorbers gives an optimum result if the front fork and the rear suspension work very well together. It is very important that the ride heights loaded front and rear are within a certain range.
1. note the current setting of the suspension
2. check the tire pressure The tire pressure and the carcass have a significant influence on the suspension. Therefore, adjustments should always be made with the same tire and tire pressure as when driving.
With progressive springs, the spring rate increases with increasing pressure over the entire spring travel, while springs with a two-stage spring rate have a defined crossover point at which the rate changes. With linear springs, the spring rate always remains the same. 
3. warm up the suspension The temperature influences the viscosity of the hydraulic oil and the tire pressure.
4. fully open the rebound and compression stages Important for initial adjustment. This will give you a better feel for the different adjustment ranges later on. This step can be omitted for subsequent adjustments.
 *The negative suspension travel is the distance that the spring is compressed by the rider and the vehicle when stationary. This is the amount of travel available for rebound over depressions in the road surface. 5. adjusting the spring
 preload The spring preload is used to adjust the negative suspension travel. Only with progressive springs does the preload have an influence on the hardness of the spring. If a spring is clearly too hard or too soft, the only solution is to replace the spring.

The rubber bump stops from the shock absorber can be used as an aid here. Alternatively, you can also work with two markings (points) on the vehicle. If these points are not on the axle of the shock absorber, the deviating spring travel due to the lever must be taken into account.

On scooters, the negative suspension travel (N1) often cannot be determined due to the low unsprung mass. In this case, only N2 with rider and payload is used for adjustments.

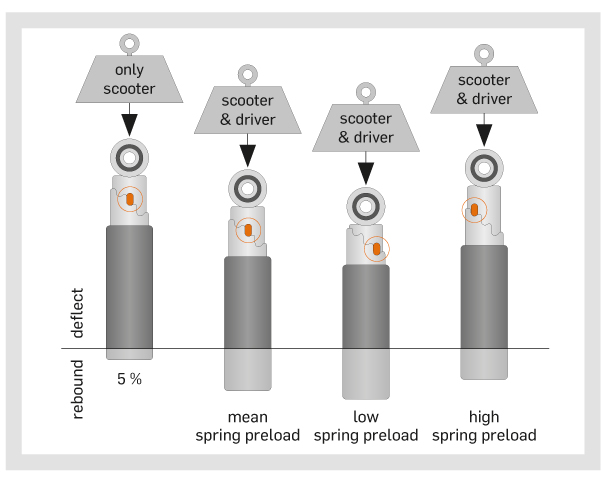
The illustration shows the ratio of spring preload to negative suspension travel*. It also shows how changing the preload changes the percentage of suspension travel available for compression and rebound.
Total suspension travel A = 100 % (wheel fully unloaded to block)
Negative suspension travel N1 (vehicle without rider and load) front = 10-20 %, rear = 5-15 %
Negative suspension travel N2 (vehicle, rider, fuel, load) Street: front = 30-35 %, rear = 25-30 % Racing: front = 20-25 %, rear = 15-20 %
Rebound damping:
If the vehicle feels unstable, spongy and rather bouncy, the rebound damping should be increased. First turn the adjustment knob 4 steps (clicks) clockwise. Take a test ride. If the vehicle now feels too hard and bumpy, simply turn it back two steps.

If the vehicle is too hard and bumpy, especially after a series of bumps, the rebound damping should be reduced. Turn the adjustment knob 4 steps counter-clockwise and take a test ride. If the vehicle is now too unstable and spongy, turn the adjustment knob back by 2 steps.

6. Adjusting the rebound
damping The rebound damping counteracts the spring force during rebound. Test both maximum settings to get a feel for the damper. To do this, compress the fork when stationary by giving it a short, powerful push. During the upward movement, keep your hands loosely on the handlebars to get a feel for the movement. This compression should be practiced several times. It must be carried out with sufficient pressure and at the correct angle to the spring axis in order to generate an overshoot. It must not resonate. Now close the rebound stage slightly until it stops exactly at the starting position N1 without overshooting. Proceed in the same way with the rear shock absorber. Here too, try to get a feel for the shock absorber by holding the rear end loosely during the upward movement. Finally, test the fork and shock absorber together. To do this, apply a strong shock to the center of the vehicle. Both must work symmetrically and reach the starting position at the same time. TIP: Document all settings/steps!

The illustration shows the relationship between rebound damping and traction, vehicle control and absorption capacity of the suspension. If traction suffers with more rebound damping, the subjective feeling of vehicle control still increases. Most riders will benefit from riding with less rebound damping than usual.
Compression damping:
The low-speed compression adjuster affects ride height, smoothness over small bumps and grip. The compression damping setting influences stability and firmness over bumps and in fast corners. If the vehicle has a low riding position, the pressure should be increased at low speed. Turn 4 clicks clockwise and test again. If this was too much, then turn back 1 click. If it feels bumpy or has poor grip with small continuous bumps, the pressure should be reduced at low speed. Turn counterclockwise in four steps. Take a test ride and make any necessary corrections 2 clicks at a time.

If it feels unstable in fast corners and has a tendency to dip easily into bumps and potholes, the compression damping should be increased. Turn clockwise 6 clicks and test again. If this was too much, turn back 3 clicks. If it feels hard and bumpy or tends to bounce under braking, the compression damping should be reduced. Turn counterclockwise in six steps. Carry out a test run and, if necessary, set back again by 3 clicks. It only makes sense to make further fine adjustments after a rough presetting.

7. Setting the compression
damping The compression damping supports the spring in the compression movement. Test both maximum settings to get a feel for the damper. To do this, compress the fork and then the rear several times with different forces while stationary. Now start testing on the track from the middle position. Ideally on a track with different bumps to simulate different situations. Only ever make a maximum of 6 clicks in one direction, then 3 back again. You have to work your way slowly towards the desired goal. High/low-speed damping of the compression stage: "Speed" refers to the compression speed of the rear axle. The low range goes up to approx. 0.6 meters per second and the high range up to approx. 1 meter per second. This means that the low range is used every time and the high range is only used additionally, e.g. for deep bumps. This means that changes to the low range always also affect the high range. Both settings should differ from each other by a maximum of 5 clicks. TIP: Document all settings/steps!

As you can see: As with rebound damping, traction and vehicle control suffer as compression damping increases. However, both do not drop as quickly as in rebound damping. Note that here too, maximum vehicle control is to the right of traction.
To the bgm shock absorber
 DE | €


 -MADE IN ITALY- Lambretta DL, GP - black browse online now!")

